本文由ilanniweb微信公众号提供友情赞助,首发于烂泥行天下
jenkins技术分享QQ群:571981257
前几篇文章中,我们都是介绍openldap的基本知识。从这篇文章开始,我们着重介绍openldap与其他系统集成的配置。
这篇文章,我们来介绍下nginx如何与openldap进行集成。
业务场景,如下:
nginx可以通过autoindex来对外提供目录索引的功能,也即是可以通过浏览器来查看并下载该目录下的所有文件,相当于一个文件服务器,该功能被使用的比较多。
默认情况下该目录下的所有文件对所有的用户都可以访问,但是因为其他原因,我们希望只有具有指定的用户或者用户组可以访问。
上述需求我们可以使用apache的认证模块,但是该模块只能是比较简单的认证。如果我们要使用比较复杂的权限控制的话,该模块就无法满足我们的要求了。
此时我们就可以通过nginx与openldap集成来实现上述要求,该方案中nginx提供目录索引功能,所有的认证通过nginx-auth-ldap模块实现,用户和用户组可以调用openldap。
PS:在此nginx我们必须使用源码编译安装,而且为了让nginx的目录索引功能显示的比较好看,我们还启用了目录索引美化模块fancyindex。
除此之外,openldap我们也已经配置完毕,相关的用户及用户组都已经存在。
该文章最终的nginx配置文件,点我下载。
一、具体需求
现在要求openldap的yunweizu用户组对/opt/yunweizu目录下的文件具有查看下载权限,而对/opt/share/目录下的文件所有用户都可以查看,并且要对该目录显示进行美化。
相关信息截图,如下:


二、安装基础依赖
首先安装nginx编译安装所需要的基础依赖,如下:
yum -y install git wget gcc openssl openssl-devel pcre pcre-devel zlib zlib-devel openldap openldap-devel libxml2 libxml2-devel libxslt libxslt-devel gd gd-devel perl-devel perl-ExtUtils-Embed GeoIP GeoIP-devel gperftools

相关依赖安装完毕后,我们开始安装nginx的nginx-auth-ldap和ngx-fancyindex模块。
三、安装nginx及其相关模块
默认情况下无论是yum安装的nginx,还是源码编译安装的nginx都没有包含ldap的认证模块,所以就需要我们在进行nginx源码编译安装时,把ldap模块配置上。
3.1 下载nginx源码
本次试验我们使用nginx最新的版本进行,下载nginx源码如下:
wget http://nginx.org/download/nginx-1.15.4.tar.gz

3.2 下载nginx-auth-ldap模块
nginx官方默认是不支持openldap认证的,所以我们需要使用第三方认证模块nginx-auth-ldap。
nginx-auth-ldap我们可以直接在github上获取到最新源码,如下:
https://github.com/kvspb/nginx-auth-ldap

考虑到众所周知的原因,我把该仓库在码云上做了镜像,同时该仓库会定期与github上对应的仓库进行同步,码云上该仓库地址如下:
https://gitee.com/ilanni/nginx-auth-ldap.git
现在我们下载nginx-auth-ldap源码到/tmp目录下,如下:
git clone https://gitee.com/ilanni/nginx-auth-ldap.git /tmp/nginx-auth-ldap

3.3 下载ngx-fancyindex模块
nginx的目录索引功能,默认样式比较简单,所以在此我们使用第三方的样式美化模块ngx-fancyindex。
ngx-fancyindex我们可以直接在github上获取到最新源码,github上该仓库地址如下:
https://github.com/aperezdc/ngx-fancyindex

考虑到众所周知的原因,我也把该仓库在码云上做了镜像,同时该仓库会定期与github上对应的仓库进行同步,码云上该仓库地址如下:
https://gitee.com/ilanni/ngx-fancyindex.git
现在我们下载ngx-fancyindex源码到/tmp目录下,如下:
git clone https://gitee.com/ilanni/ngx-fancyindex.git /tmp/ngx-fancyindex

3.4 编译安装nginx
以上准备完毕后,我们就可以正式进行对nginx进行编译安装。
解压nginx压缩包,并进入该目录,如下:
tar -xf nginx-1.15.4.tar.gz
cd nginx-1.15.4

./configure –add-module=/tmp/ngx-fancyindex –add-module=/tmp/nginx-auth-ldap –with-threads –with-file-aio –with-http_auth_request_module –with-http_ssl_module –with-http_v2_module –with-http_realip_module –with-http_addition_module –with-http_xslt_module=dynamic –with-http_image_filter_module=dynamic –with-http_geoip_module=dynamic –with-http_sub_module –with-http_dav_module –with-http_flv_module –with-http_mp4_module –with-http_gunzip_module –with-http_gzip_static_module –with-http_random_index_module –with-http_secure_link_module –with-http_degradation_module –with-http_slice_module –with-http_stub_status_module –with-http_perl_module=dynamic –with-mail=dynamic –with-mail_ssl_module –without-mail_pop3_module –without-mail_imap_module –without-mail_smtp_module –with-pcre –with-pcre-jit –with-stream –with-stream=dynamic –with-stream_ssl_module –with-stream_ssl_preread_module –with-google_perftools_module –with-debug


make && make install


测试nginx是否安装成功,如下:
/usr/local/nginx/sbin/nginx -t

有关nginx的源码编译安装详细过程,可以参考这篇文章《烂泥:CentOS上nginx与tengine服务器源码安装》。
3.5 nginx加入系统服务
nginx编译安装完毕后,我们现在把nginx加入系统服务,使用systemctl命令进行控制。
如下:
cat > /usr/lib/systemd/system/nginx.service << “EOF”
[Unit]
Description=nginx
After=network.target
[Service]
Type=forking
PIDFile=/usr/local/nginx/logs/nginx.pid
ExecStartPre=/usr/local/nginx/sbin/nginx -t
ExecStart=/usr/local/nginx/sbin/nginx
ExecReload=/usr/local/nginx/sbin/nginx -s reload
ExecStop=/usr/local/nginx/sbin/nginx -s stop
PrivateTmp=true
[Install]
WantedBy=multi-user.target
EOF

systemctl enable nginx
systemctl start nginx
systemctl status nginx

3.6 nginx加入到系统命令
为了更好的使用nginx,我们现在把nginx加入到系统命令中。如下:
cat >> /etc/profile << “EOF”
export PATH=$PATH:/usr/local/nginx/sbin/
EOF
source /etc/profile
nginx -t

四、nginx与openldap集成
在第三章节nginx安装完毕后,我们来配置使其与openldap集成。配置文件如下:
cat > /usr/local/nginx/conf/nginx.conf << “EOF”
user ftp;
worker_processes 1;
events {
worker_connections 1024;
}
http {
include mime.types;
default_type application/octet-stream;
log_format htlog ‘[$time_local] [FROM:$remote_addr][TO:$scheme://$server_name][FORWARD:$upstream_addr] $status’
‘”$request” $body_bytes_sent’ ‘ Bytes, ‘
‘”request_uri”: “$request_uri”, ‘
‘”http_cookie”: “$http_cookie”, ‘
‘”remote_user”: “$remote_user”, ‘
‘”request_time”: “$request_time”, ‘
‘”$http_referer” “$http_user_agent” “$http_x_forwarded_for”‘;
sendfile on;
keepalive_timeout 65;
gzip on;
ldap_server ilannildap_yunweizu {
auth_ldap_cache_enabled on;
auth_ldap_cache_expiration_time 10000;
auth_ldap_cache_size 1000;
connect_timeout 5s;
bind_timeout 5s;
request_timeout 5s;
satisfy any;
url ldap://192.168.123.8:389/dc=ilanni,dc=com?uid?sub;
binddn “cn=root,dc=ilanni,dc=com”;
binddn_passwd ilanni;
group_attribute uniquemember;
group_attribute_is_dn on;
require group “cn=yunweizu,ou=Group,dc=ilanni,dc=com”;
}
server {
listen 80;
server_name yunweizu.ilanni.com;
access_log /var/log/nginx/yunweizu.ilanni.com-access.log htlog;
error_log /var/log/nginx/yunweizu.ilanni.com-error.log;
charset utf-8,gbk;
location / {
root /opt/yunweizu/;
fancyindex on;
fancyindex_exact_size off;
fancyindex_localtime on;
fancyindex_default_sort name_desc;
fancyindex_time_format “%Y-%m-%d %H:%M”;
add_header ‘Cache-Control’ ‘no-store, no-cache, must-revalidate, proxy-revalidate, max-age=0’;
expires -1;
auth_ldap “Forbidden”;
auth_ldap_servers ilannildap_yunweizu;
}
}
}
EOF


以上就是nginx与openldap集成的配置文件部分,下面我们进行测试。
五、测试访问权限
在浏览器中输入yunweizu.ilanni.com,如下:

通过上图,我们可以很明显的看出现在需要输入用户名和密码才能访问,输入openldap中我们配置的对应权限的用户名和密码。如下:


通过上图,我们可以很明显的看出现在可以访问相关的目录和下载相关文件。
如果我们输入没有权限的用户呢,如下:

你会发现会一直提示,让你输入用户名和密码。这也证明了nginx与openldap集成成功,并且权限的控制也确实如我们前面的需求一样。
六、目录美化主题
按理说到上一章节,本篇文章就应该结束了。但是第一章节中还有一个需求,我们没有去验证目录索引的美化。
因为nginx-auth-ldap模块与ngx-fancyindex模块的之间bug,导致目录索引美化模板与openldap认证冲突。所以在此我们使用新的域名来验证目录索引的美化。
6.1 下载美化主题
目录索引美化主题,我们可以从github上下载最新的模板。如下:
https://github.com/Naereen/Nginx-Fancyindex-Theme

下载主题仓库,如下:
git clone https://github.com/Naereen/Nginx-Fancyindex-Theme /tmp/Nginx-Fancyindex-Theme

以上主题仓库里面有两个主题,我们现在使用其中一个,如下:
cp -a /tmp/Nginx-Fancyindex-Theme/Nginx-Fancyindex-Theme-light /opt/share/
ls -al /opt/share/

6.2 修改nginx配置文件
现在我们要启用美化主题,需要修改nginx配置文件,内容如下:
server {
listen 80;
server_name share.ilanni.com;
access_log /var/log/nginx/share.ilanni.com-access.log htlog;
error_log /var/log/nginx/share.ilanni.com-error.log;
charset utf-8,gbk;
location / {
root /opt/share/;
fancyindex on;
fancyindex_localtime on;
fancyindex_exact_size off;
fancyindex_header “/Nginx-Fancyindex-Theme-light/header.html”;
fancyindex_footer “/Nginx-Fancyindex-Theme-light/footer.html”;
fancyindex_ignore “Nginx-Fancyindex-Theme-light”;
fancyindex_name_length 255;
fancyindex_default_sort name_desc;
fancyindex_time_format “%Y-%m-%d %H:%M”;
}
}

访问share.ilanni.com,如下:

通过上图,我们可以很明显的看出最新的页面显示的样式已经和原来不一样了,而且该页面还支持搜索功能。
到此有关nginx的目录索引与openldap的集成,以及目录索引美化,已经全部介绍完毕。
未经允许不得转载:烂泥行天下 » 烂泥:openldap与nginx集成
 烂泥:OpenLDAP安装与配置,通过docker方式(三)
 烂泥:通过docker加速下载国外文件
 烂泥:base64加密与解密
 烂泥:jfrog artifactory的安装与使用
 烂泥:k8s安装与配置ingress(一)
 烂泥:yum安装php5.6
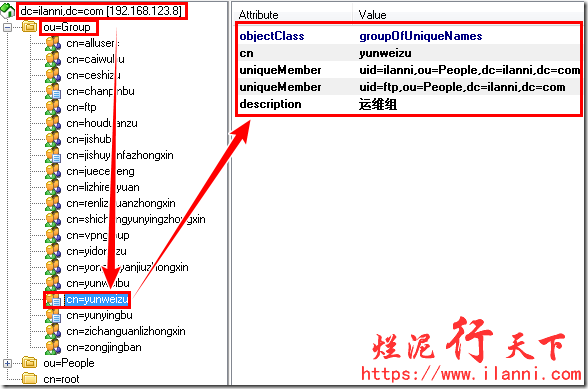 烂泥:openldap主从搭建与配置
 烂泥:squid与openldap集成
